
After thinking a bit about the customer journey you want to create, or at least some of the customer segments you want to begin targeting, it is time to create your own Saved Opportunities.
Advanced Targeting
Using the left hand navigation in Happy Marketers, select "Use Advanced Targeting" and then "Target Customers." This will take you to the Advanced Targeting section of the tool:

The first step to take from here is to click "Run Targeting." This syncs Happy Marketers to the latest data sync from your POS system. After clicking this, you'll see the button change to "Refresh Targeting" and you'll also see the number of opt-in customers with unique phone numbers and email addresses in your data set:

Next you'll find a few items you can click:
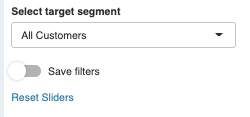
- Select Target Segment - opens a dropdown of pre-built customer segments you can select - these will update the sliders below automatically, and you can further adjust or tune these segments from there. Most users opt to keep this on "All Customers" and adjust the sliders manually
- Save Filters - we will come back to this one below!
- Reset Sliders - clicking this will reset the sliders back to their original positions
Finally, you'll now see a number of sliders available to use as a way to filter customers based on the data you have available in your POS system. Here's what each of these filters looks at in more detail - first you have filters based on Purchase Patterns, Spend, and Text History:
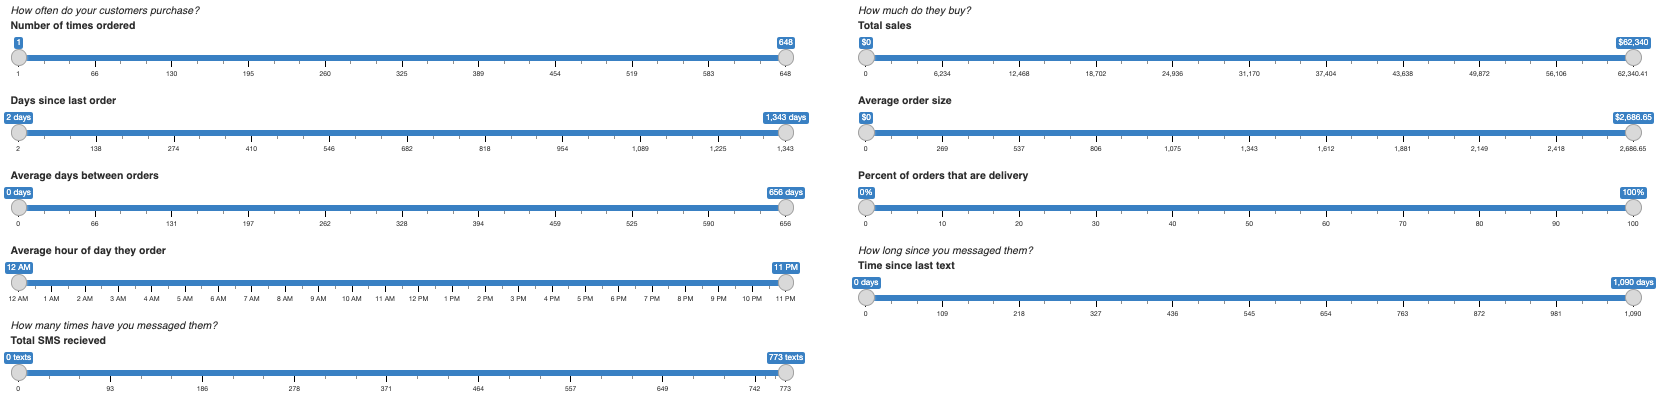
- Number of times ordered - how many lifetime orders the customer has placed
- Can be defined as a range (3-5 times) or single number (1)
- In some cases, a value of 0 will be an option, and typically occurs if you have made a POS change
- Days since last order - number of days since the customer's last purchase
- Average days between orders - how frequently a customer shops
- Average hour of day they order - what time of day the customer typically orders
- For example, you could send a text to evening shoppers in the late afternoon
- Total SMS received - the total number of text messages that customers have received from you
- Total sales - lifetime sales based on a customer's total spend
- Average order size - how much a customer typically spends per purchase
- Percent of orders that are delivery - the percentage of orders that are delivery orders vs in-store
- Time since last text - number of days since this customer last received a text from you
Next, we'll look at some filter options based on Location:
- Last Order Facility - where the customer placed their most recent order
- For multi-location operators, use this to select customers from one or multiple stores, or select all to reach customers across all locations
- Never Ordered includes customers who are opted-in, but do not have order data in the integrated POS; this most commonly occurs following a POS change
- Last Order Source - how the customer placed their most recent order
- This may include in-store, e-commerce, or third-party ordering platforms integrated with your POS
- Filter Cities - which city the customer resides in
- Filter Zipcodes - which zip code the customer resides in
We also map other customer information that you set up within your POS system. For example, customer groups from POS can be mapped into Happy Marketers for targeting. You can also filter based on the number of loyalty points a customer has if you are a loyalty system integrated with your POS:

- Target Groups - these are mapped to target groups you create in your POS system. If you have questions about which groups show up here and how to enter the correct field in your POS, please ask your CSM or success@happycabbage.io
- Loyalty Points - this is mapped to loyalty points within your POS system, and you can filter customers based on the number of loyalty points they have
- This does not update or affect a customer's loyalty balance; it is simply a way to message customers based on their points balance
Demographics filters let you segment customers based on additional parameters:

- Target Customer Types - Medical or Recreational customer status
- Target genders - gender of customer
- Age - age of customer
- Birthday - days until the customer's birthday
- 0 means their birthday is today
Finally, you can filter based on a customer's product preferences:

- Target Brands - brands the customer has purchased before
- Select multiple brands to create an OR statement (i.e. if you select Raw Garden and Alien Labs, you will get customers who have purchased either Raw Garden or Alien Labs before)
- Product Category - what percentage of dollars has the customer spent in a specific product category
- For example, if you filter the Flower category for 50%-100% you will select customers who spend at least 50% or more of their dollars on Flower products.
Using Filters to create a Saved Opportunity
Now that you've familiarized yourself with the filter options available, let's walk through how to save filter settings to create a Saved Opportunity. Let's start by thinking about the segment we want to create for the customer journey. As an example, let's create a Saved Opportunity for Latent Vape Customers.
This segment will let me reach out to customers who prefer vapes, have shopped multiple times, but have not shopped recently. I'll want to keep nurturing this segment with regular vape deals because these are customers I want to win back before they're lost. We'll start by setting the filters:
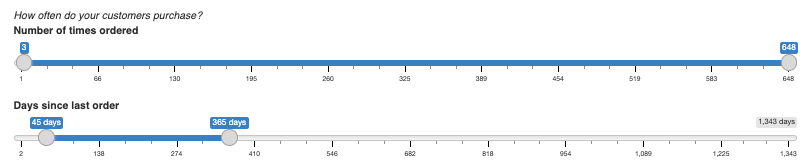
- Number of times ordered: set to 3 or more because I want customers that have made repeat purchases from my business
- Days since last order: set to 45-365 days because I want customers that have not ordered recently. I also removed customers who have not purchased in over a year since they will likely require a bigger promotion to win back and I don't want to waste more messages on them

- Vape Category: set to 50%-100% because I want to target shoppers who spend the majority of their dollars on vape products
Once the filters have been correctly set, scroll to the top of the page and click "Refresh Targeting" to see how many customers are in this segment - in this example we have 1,112 unique phone numbers belonging to this segment:

From here, you can make adjustments to the filter settings if you want to adjust the audience size further. Also note that your audience must be smaller than 5,000 customers in order to adhere to our Best Practices for having high delivery rates.
After finalizing your filter settings and clicking "Refresh Targeting" for a final time, you can create a Saved Opportunity by selecting the "Save Filters" button and a box will appear:

Name your Saved Opportunity based on the customer segment - it is helpful to be as descriptive as possible in the name to remember the filter settings. After clicking save, a pop-up will appear saying this has saved successfully. From here, you can continue to make additional Saved Opportunities by changing the filter settings, hitting "Refresh Targeting," naming a new filter name, and clicking save.
These custom audiences will now be available in your Saved Opportunities:

Deleting a Saved Opportunity
If you ever need to remove a Saved Opportunity, you can delete it by expanding it and clicking "Delete this filter"

Now that you're up to speed with how Key Opportunities and Saved Opportunities work, and how to create Saved Opportunities, it is time to learn how to draft and send messages in Happy Marketers.